Showing posts with label Crafts. Show all posts
Showing posts with label Crafts. Show all posts
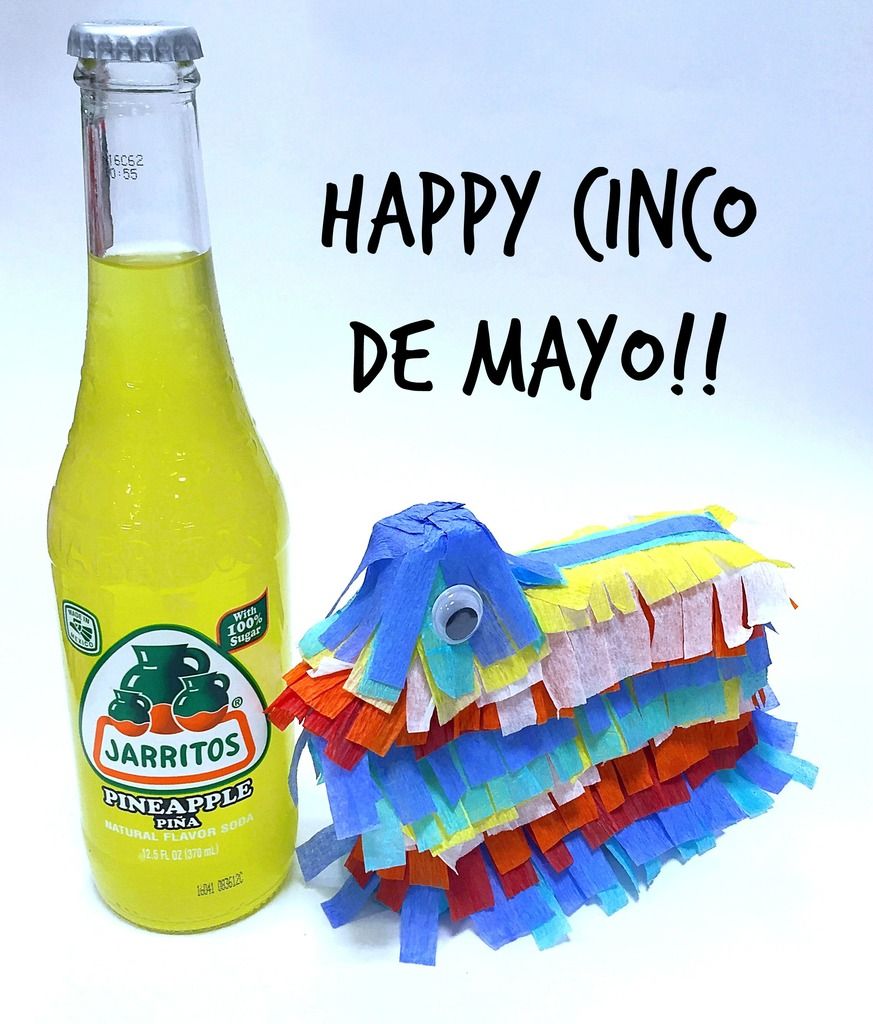
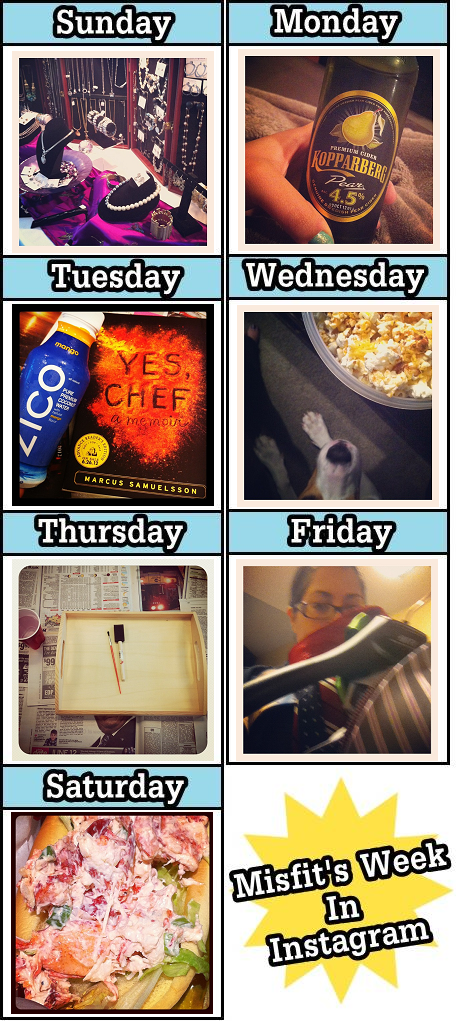
May 5, 2016
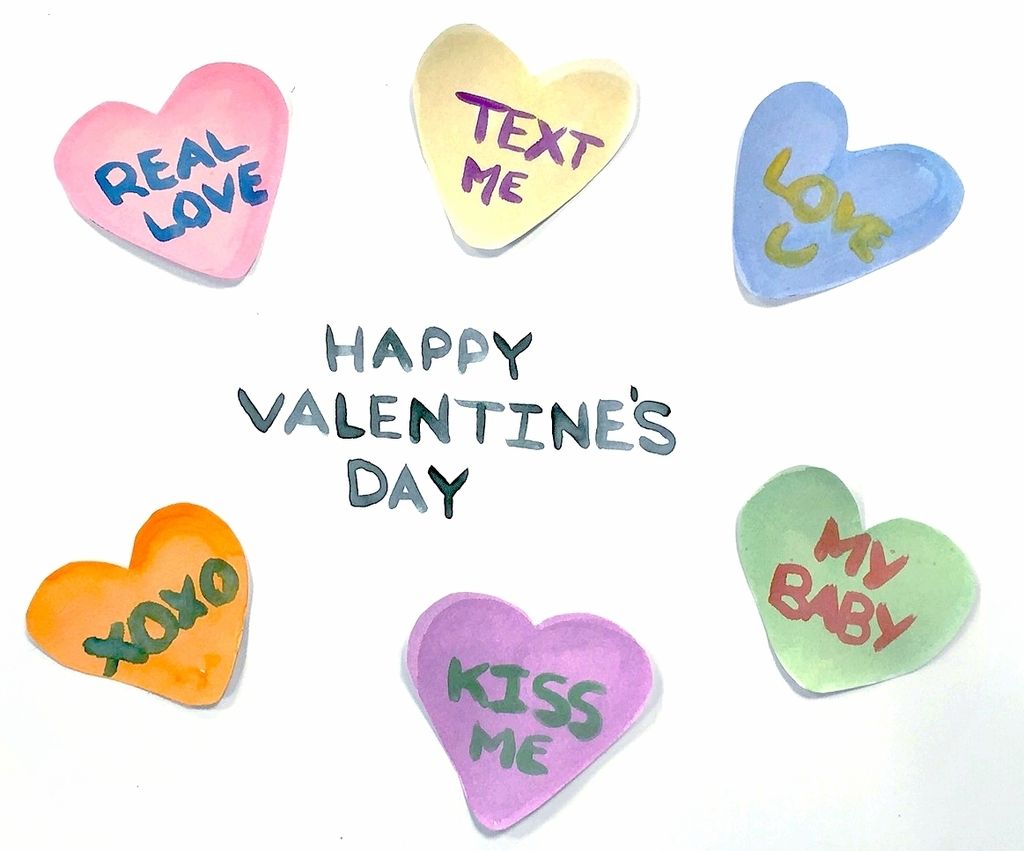
February 14, 2016
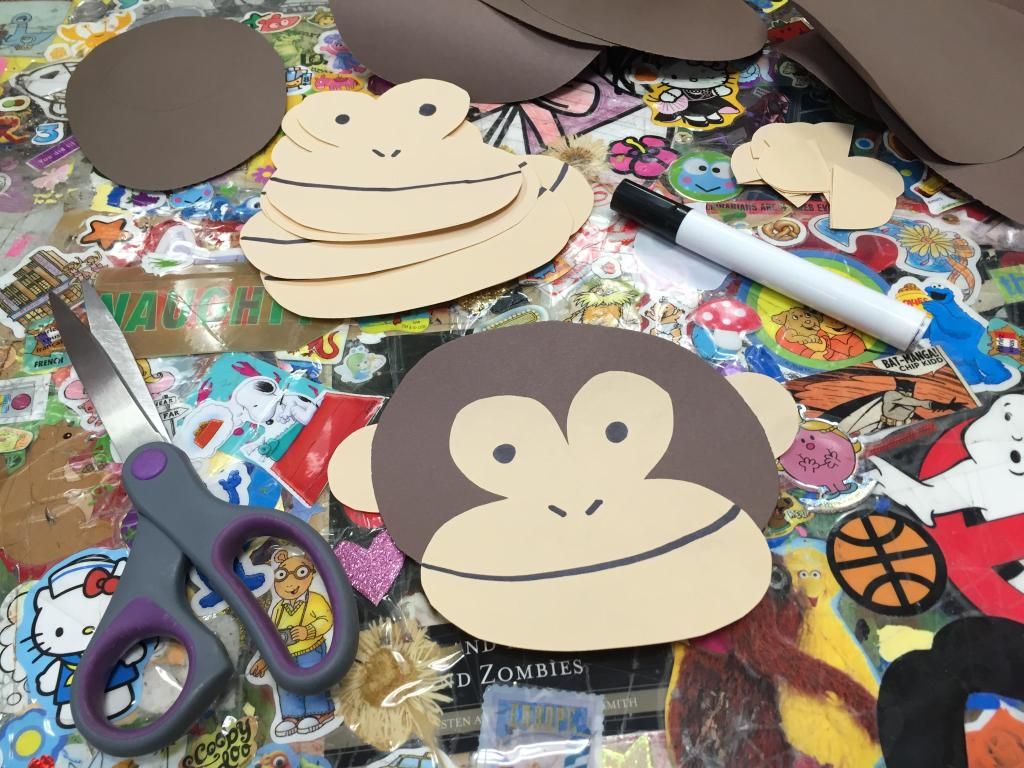
Happy Valentine's Day...
Even though Justin and I don't really celebrate Valentine's Day (Our dating anniversary is in two weeks and my birthday is four to five days later depending on the year, so I usually get one lump celebration) and I am the Sunday librarian today, I wanted to wish you all a happy Valentine's Day!
 I hope you all have a wonderful day whether you celebrate or not!! And I hope you all enjoy the stupid little painting I made for all of you while I was at work the other day.
August 15, 2015
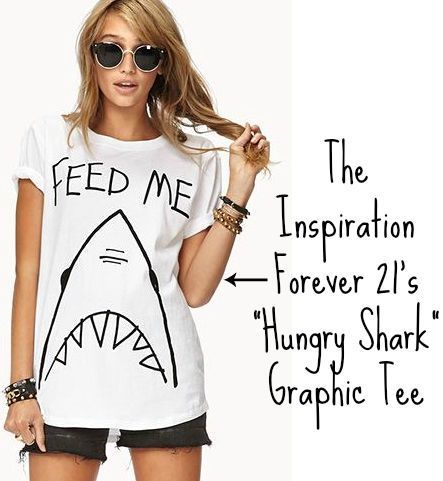
Getting My Craft On | DIY Shark Tank Top...
So when they released the schedule of movies a couple of months back Phil decided that we should all go watch Jaw (1975) the night they show it and that night is next week.
Since I've been on a kick making/buying things for our various outings as of late, I decided to search Pinterest to see if there were any feasible shark things that I could make happen. And while I was searching I came across a shirt from Forever 21 (Which I apparently I had pinned a while back) of a line drawn shark that said "Feed Me" above it and I immediate needed it in my life to wear next week. Unfortunately it was no longer available (Damn it Forever 21!) but I decided that I wanted it bad enough that I'd make it for myself.

SUPPLIES
- Paper
- Felt Tip Pen
- Plain White Shirt → I used an Old Navy Women's Plus Raw-Edge Tanks -- $6.00*
- Fabric Markers or Sharpie → I used a Sharpie Magnum® Permanent Marker -- $3.99
- Cardboard
STEP ONE: Doodle out the design on your piece of paper over and over again until you think you have it down. Even though this shark is super easy, I actually ended up drawing this shark all over the place for like two days just because I love him so much.
STEP TWO: Place the shirt on a flat surface you can draw on with the cardboard in the middle of the shirt, so the ink wont bleed from one side to the other.
STEP THREE: Hold the fabric taut and draw your design on the shirt.
STEP FOUR: Admire your new bad ass shirt.
This is how mine came out...
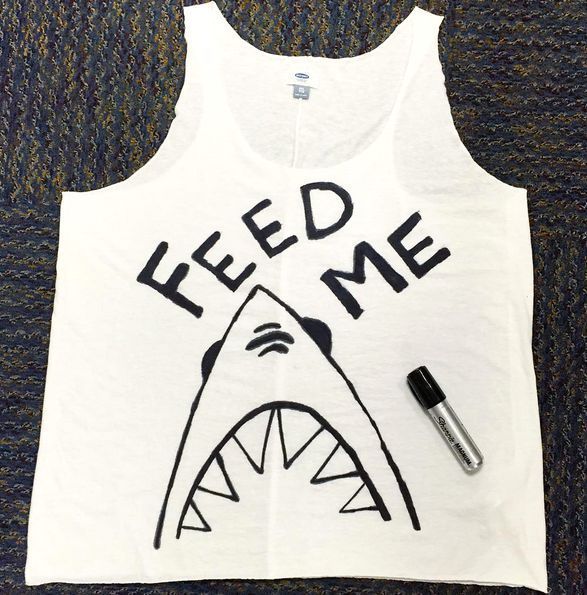
* I got the shirt on sale for $6.00 ever though it's listed on the site for $19.00
February 4, 2015
Goodbye Twenties | Hello Thirties...
In exactly one month I will be thirty-years-old. And in honor of the death of my twenties I have decided to take several photos a day for the next twenty-eight days. Of what? I honestly don't know yet, maybe a selfie or a picture of my feet or what I'm working on or cooking or whatever. But I'm going to take a bunch of pictures day and I'm starting with these...

 That's
all I got to take because we were short staffed and I had to do other
people's programs. Hopefully I'll have more in my future posts.
That's
all I got to take because we were short staffed and I had to do other
people's programs. Hopefully I'll have more in my future posts.
 That's
all I got to take because we were short staffed and I had to do other
people's programs. Hopefully I'll have more in my future posts.
That's
all I got to take because we were short staffed and I had to do other
people's programs. Hopefully I'll have more in my future posts.
January 19, 2015
RE: Picking Out Artwork + A Sherlock Inspired DIY...
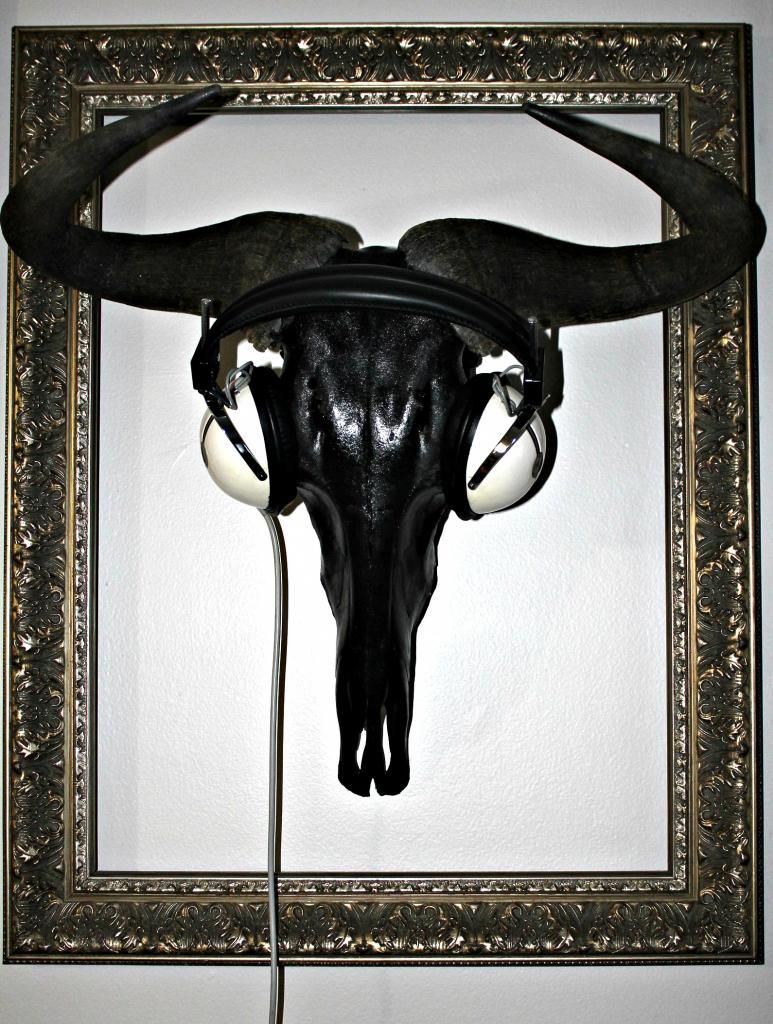
Back in August I mentioned in a post that Justin and I were looking into artwork for our apartment. So I wanted to do a little update on that because we've picked up some of the pieces that I mentioned in that post as well as some others, plus I wanted to share our Sherlock bison skull inspired art project.
So as of right now these are the pieces we ended up with...


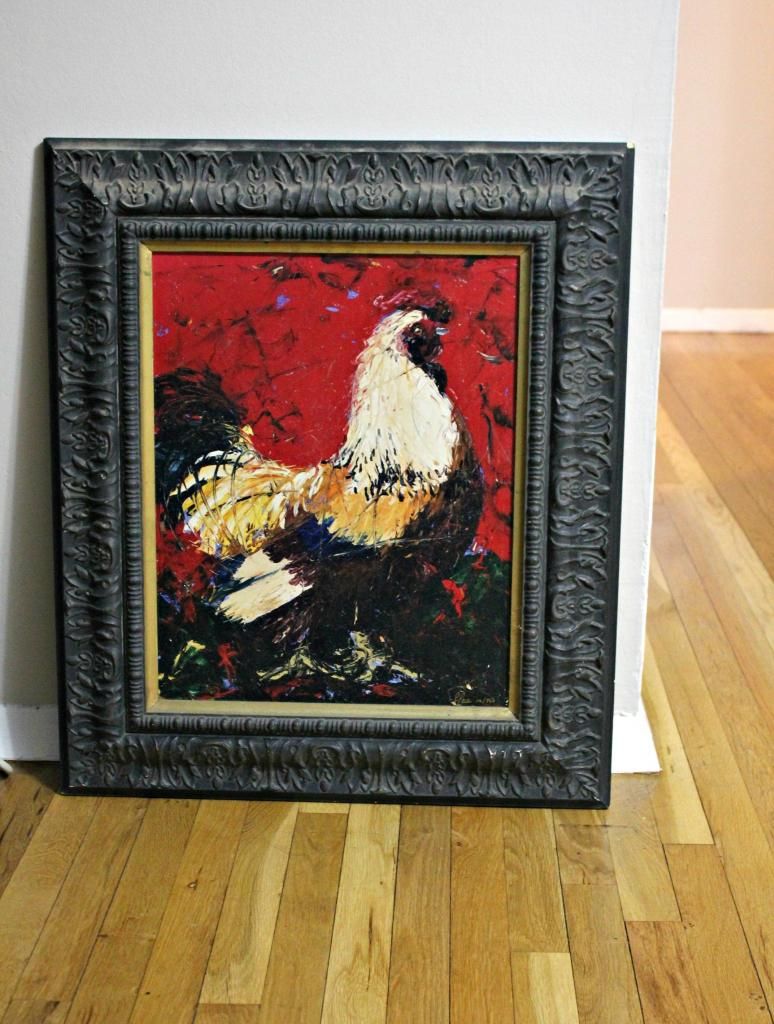
 Unfortunately I don't know the artists of several of these because I picked them up at New York Comic Con back in October at various booths or in the case of the cock, the thrift store. But the ones I know are as follows...
Even though we ended up with a bunch of prints we felt like we needed a little something more and that is when we decided that we should have a bison skull like the one in Sherlock's apartment in BBC's Sherlock (2010-Present) -- Which for those of you unfamiliar with the series looks like this.
 SUPPLIES
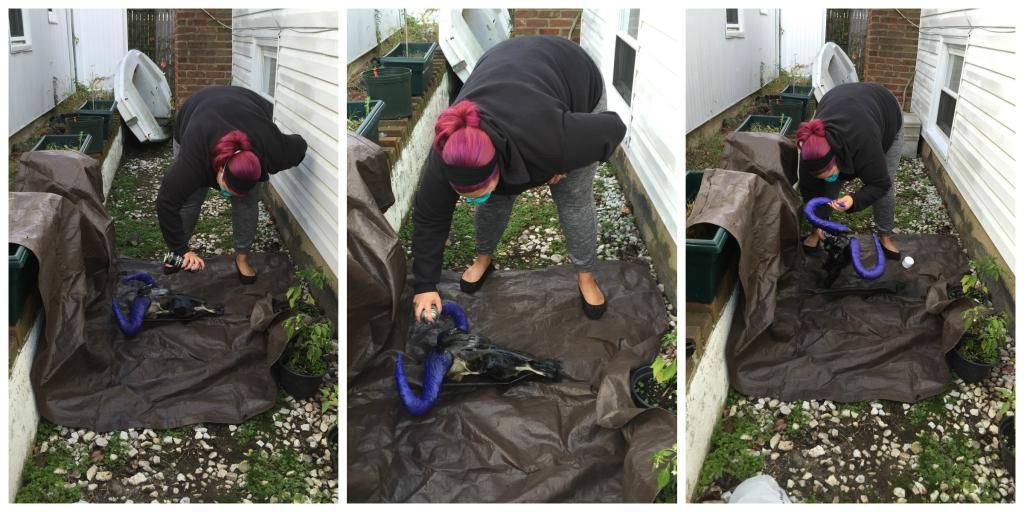
STEP ONE: Using painters tape, mask off the horn (The skull on the Sherlock set isn't completely spray painted. The horns were left in their natural state, so we did the same).
STEP TWO: Put down a tarp (If you don't have one you can get one from Home Depot or your local hardware store. My parents' happened to have a bunch so we didn't need to buy one), put on a mask and spray paint away.
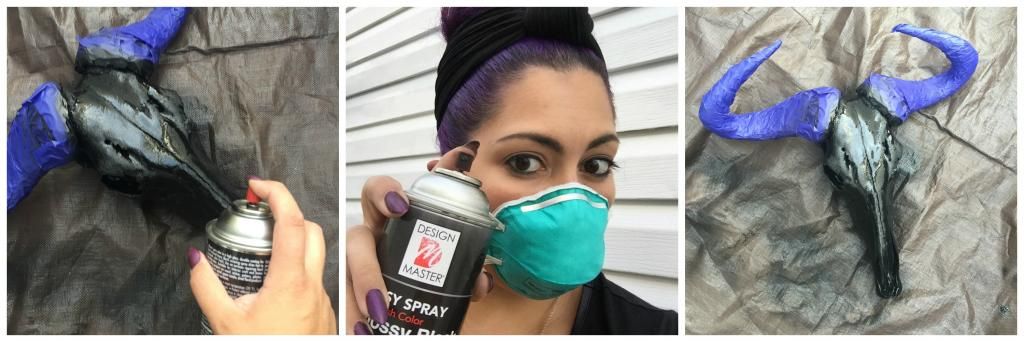
 As you can probably tell seeing as my hair is two different colors in these photos, this was not a one day project. I spray painted the skull with one coat of the glossy black paint and after I noticed I had missed a few spots and that the skull absorbed the paint weird in spots so it wasn't super shiny. So after making sure the skull was completely dry I went back, gave it another coat and it was just the way I wanted it.
STEP THREE: Once the skull is completely dried, remove the painters tape.
STEP FOUR: Loop wire through the back of the skull to create a sturdy base for hanging.
STEP FIVE: Pick the spot you'd like to hang the skull (I recommend using a stud finder) and hang it up -- Since we don't own our apartment we used Super Hooks to hang, you can use nails.
STEP SIX: This step is optional and not exactly like the prop skull in Sherlock, but we decided to put a picture frame around the skull in lue of mounting it on a black painted wooden plaque. So we had to figure out exactly where we wanted the skull, put the Super Hooks up without the skull and fit the picture frame properly around them, hung it and then hung the skull.
STEP SEVEN: Put the headphones on the skull and enjoy.
Total Cost: $172.33
Not the cheapest of wall art but we love how it came out and everyone who comes over tells us how cool it is.
So, what do you guys think of our art choices and/or our little Sherlock DIY? Do you have any cool artwork up in your homes? Lemme know!
* The headphones used on the actual prop are Eagle International SE-40 Headphones but Justin couldn't find a pair and ended up liking the look of the TEAC HP-101's better.
So as of right now these are the pieces we ended up with...
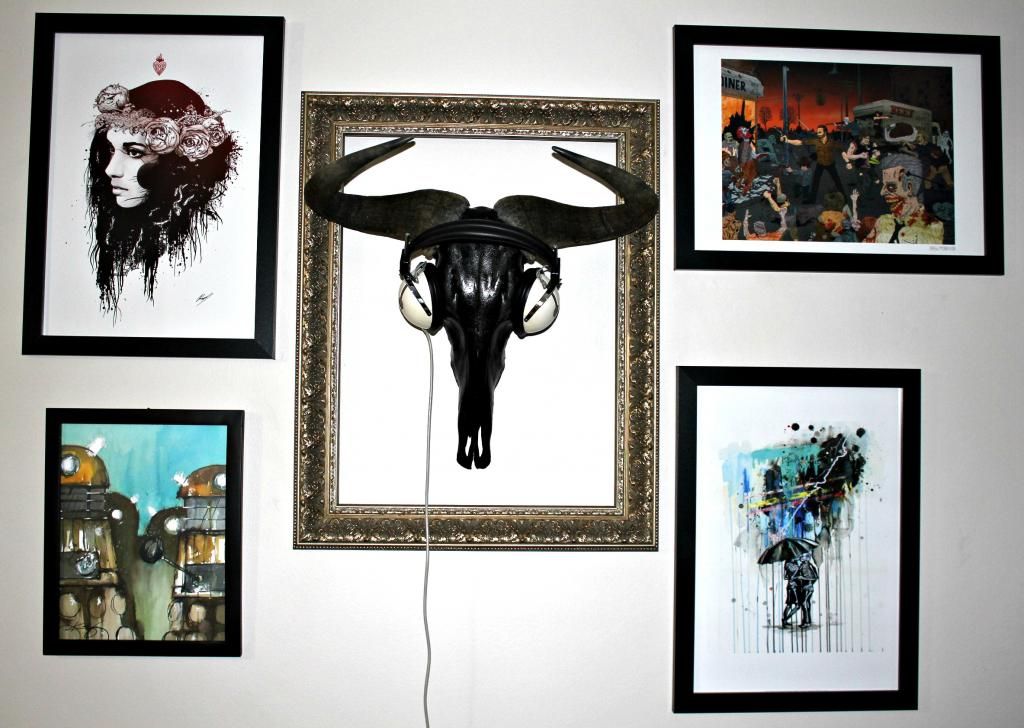
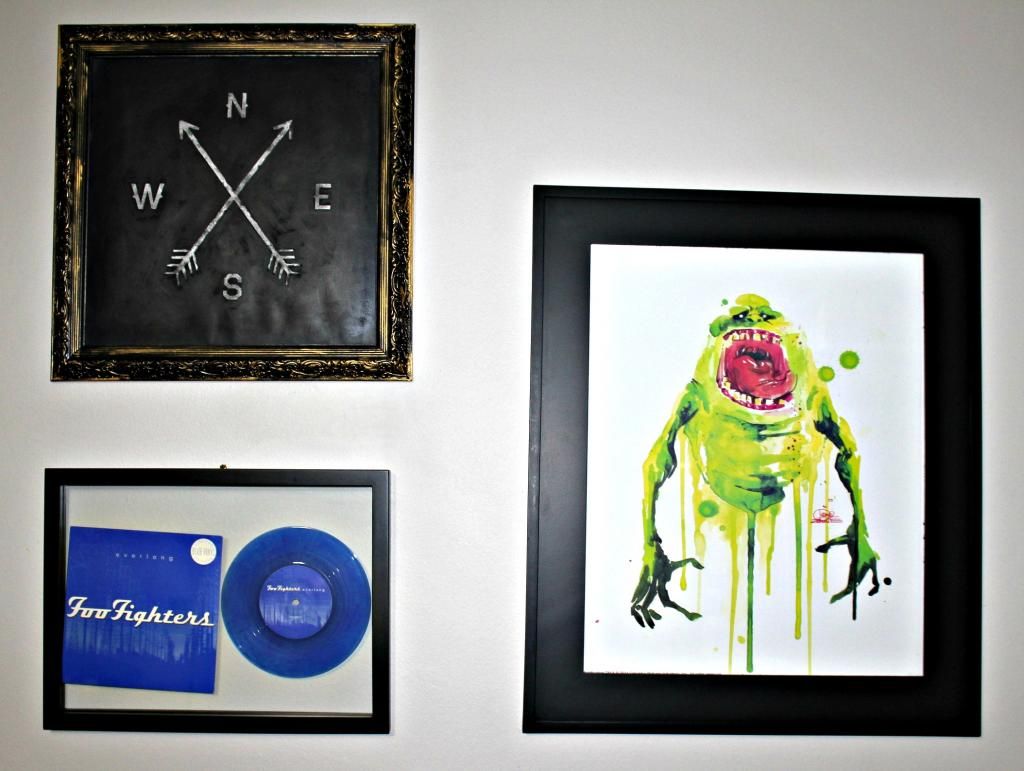
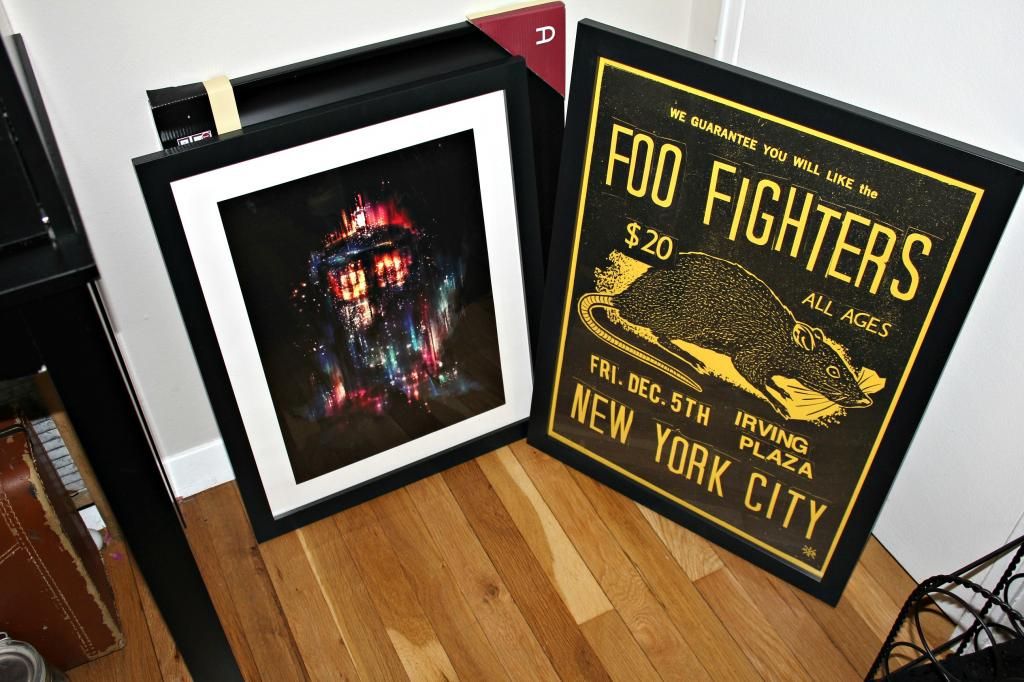
- "Love Shock" by Lora Zombie
- "Slimer" by Lora Zombie
- "Compass" by Zach Terrell
- "All of Time and Space" by Alice X. Zhang
Even though we ended up with a bunch of prints we felt like we needed a little something more and that is when we decided that we should have a bison skull like the one in Sherlock's apartment in BBC's Sherlock (2010-Present) -- Which for those of you unfamiliar with the series looks like this.
- South African Blue Wildebeest Skull (eBay) - $79.99
- TEAC HP-101 Vintage Headphones* (eBay) - $34.99
- ProMask Blue Designer Painter’s Tape (Home Depot) - $3.93
- Design Master Glossy Black Spray Paint (Michaels) - $7.49
- Studio DéŽcor® Antique Champagne Open Back Frame 18x24 (Michaels) -
$79.99$35.99 - Super Hooks (Home Depot) - $5.95
- Beadalon® German Style Wire, Round, 22 Gauge (Michaels) - $3.99
STEP ONE: Using painters tape, mask off the horn (The skull on the Sherlock set isn't completely spray painted. The horns were left in their natural state, so we did the same).
STEP TWO: Put down a tarp (If you don't have one you can get one from Home Depot or your local hardware store. My parents' happened to have a bunch so we didn't need to buy one), put on a mask and spray paint away.
 |
| I don't know how to ladies over at A Beautiful Mess always look so cute crafting |
STEP THREE: Once the skull is completely dried, remove the painters tape.
STEP FOUR: Loop wire through the back of the skull to create a sturdy base for hanging.
STEP FIVE: Pick the spot you'd like to hang the skull (I recommend using a stud finder) and hang it up -- Since we don't own our apartment we used Super Hooks to hang, you can use nails.
STEP SIX: This step is optional and not exactly like the prop skull in Sherlock, but we decided to put a picture frame around the skull in lue of mounting it on a black painted wooden plaque. So we had to figure out exactly where we wanted the skull, put the Super Hooks up without the skull and fit the picture frame properly around them, hung it and then hung the skull.
STEP SEVEN: Put the headphones on the skull and enjoy.
Total Cost: $172.33
Not the cheapest of wall art but we love how it came out and everyone who comes over tells us how cool it is.
So, what do you guys think of our art choices and/or our little Sherlock DIY? Do you have any cool artwork up in your homes? Lemme know!
* The headphones used on the actual prop are Eagle International SE-40 Headphones but Justin couldn't find a pair and ended up liking the look of the TEAC HP-101's better.
October 27, 2014
Photo-An-Hour (And A Few Halfs): Saturday, October 25th...
A little late on Saturday I decided I should do an photo-an-hour. Here is how my day went...
12:00PM - Driving to go run errands.

1:00PM - Thrifting.

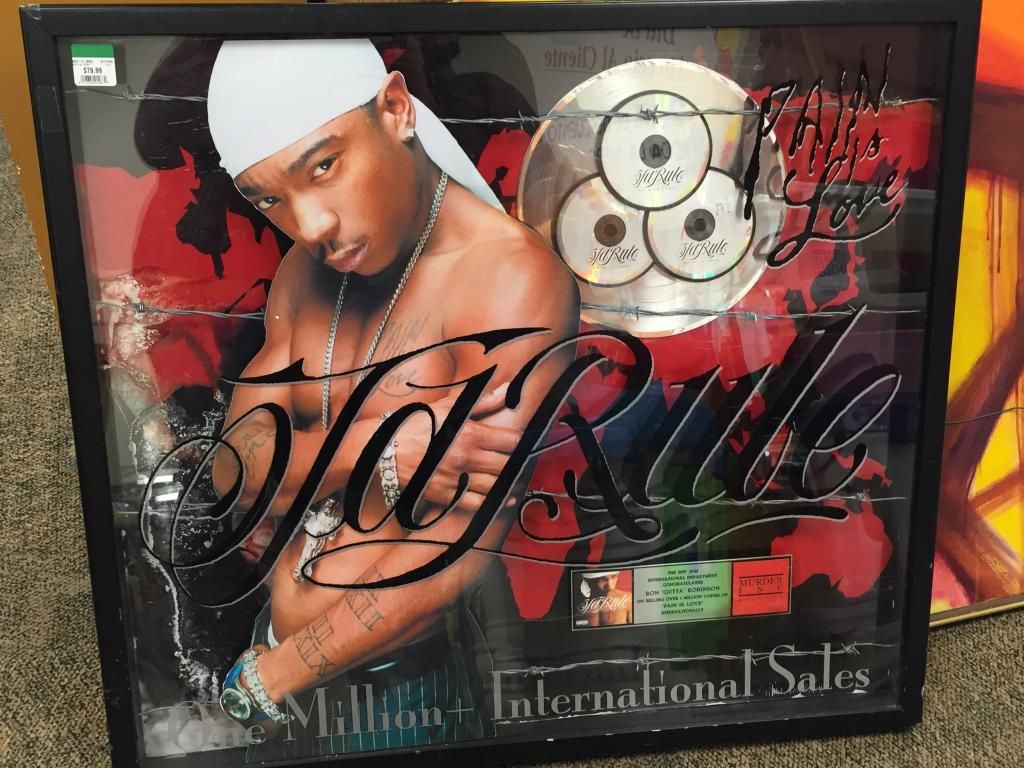
BONUS PICTURE + A SONG - JaRule plaque!

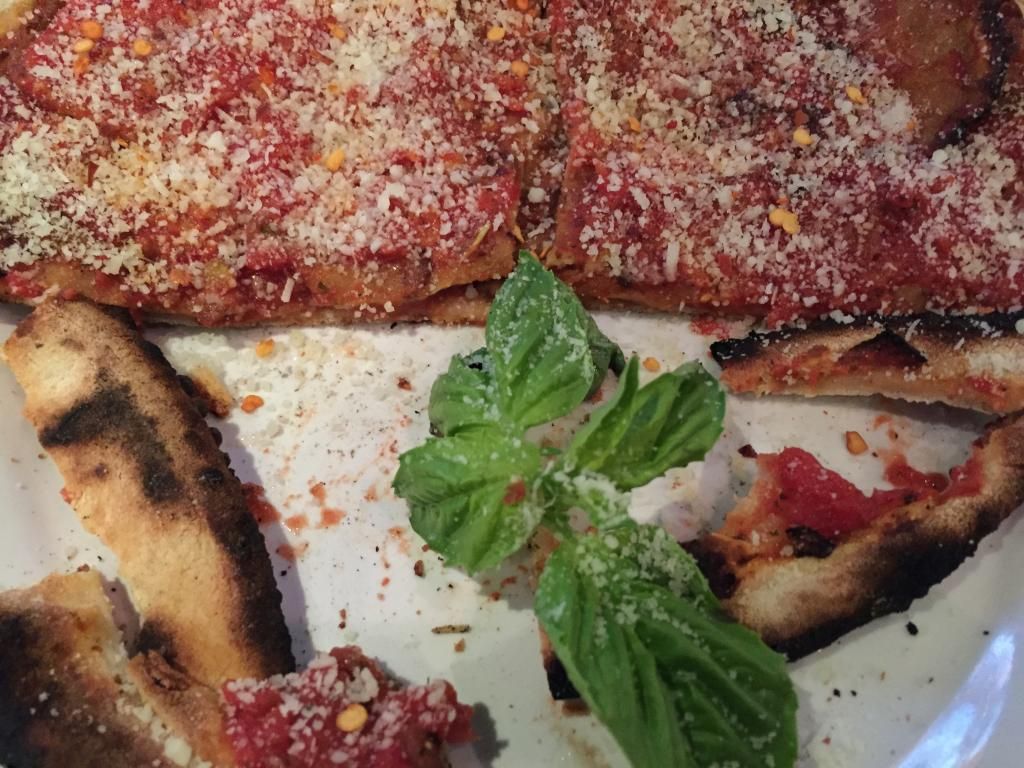
2:00PM - Justin & I headed over to Anthony's Coal Fired Pizza for lunch.

3:00PM - Since there is a Barnes & Nobel in the same shopping center as the restaurant, we went in.

4:00PM - We went shopping at Micheal's for craft supplies for a DIY I have coming up.

4:30PM - Fancy grocery shopping.

5:00PM - Quick trip to Home Depot because I needed painters tape for that DIY I mentioned.

5:30PM - More thrifting.

6:00PM - Drove home.

After that things got really boring, so I didn't take anymore pictures.
12:00PM - Driving to go run errands.
1:00PM - Thrifting.
BONUS PICTURE + A SONG - JaRule plaque!
2:00PM - Justin & I headed over to Anthony's Coal Fired Pizza for lunch.
3:00PM - Since there is a Barnes & Nobel in the same shopping center as the restaurant, we went in.
4:00PM - We went shopping at Micheal's for craft supplies for a DIY I have coming up.
4:30PM - Fancy grocery shopping.

5:00PM - Quick trip to Home Depot because I needed painters tape for that DIY I mentioned.

5:30PM - More thrifting.
6:00PM - Drove home.

After that things got really boring, so I didn't take anymore pictures.
February 27, 2014
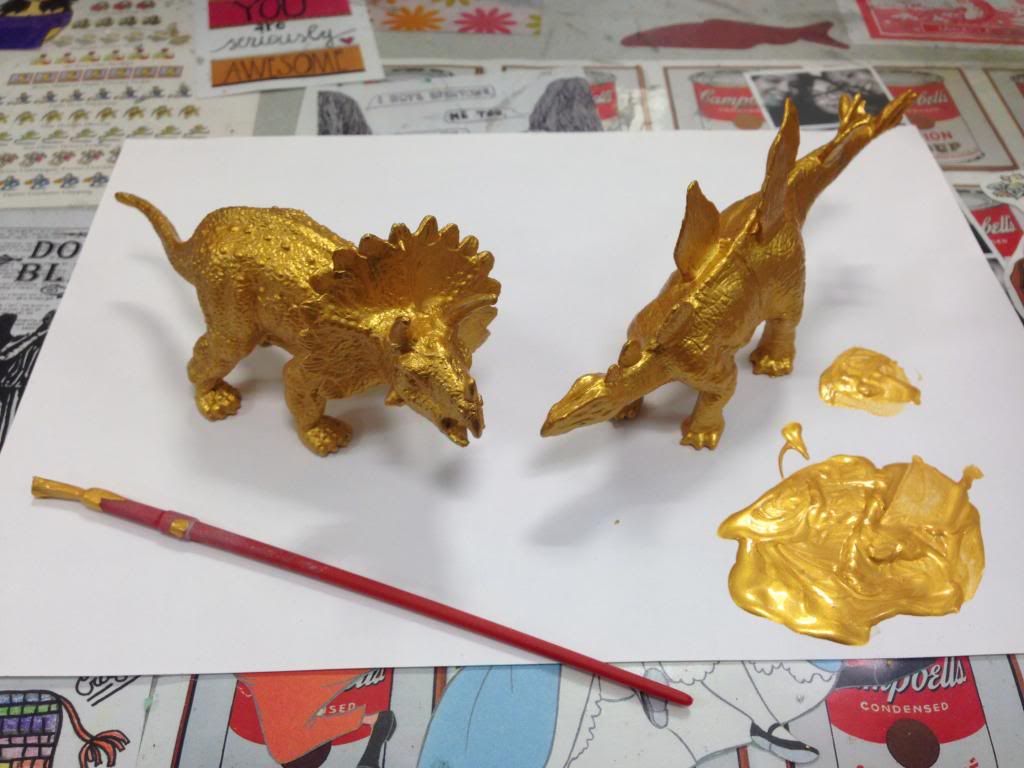
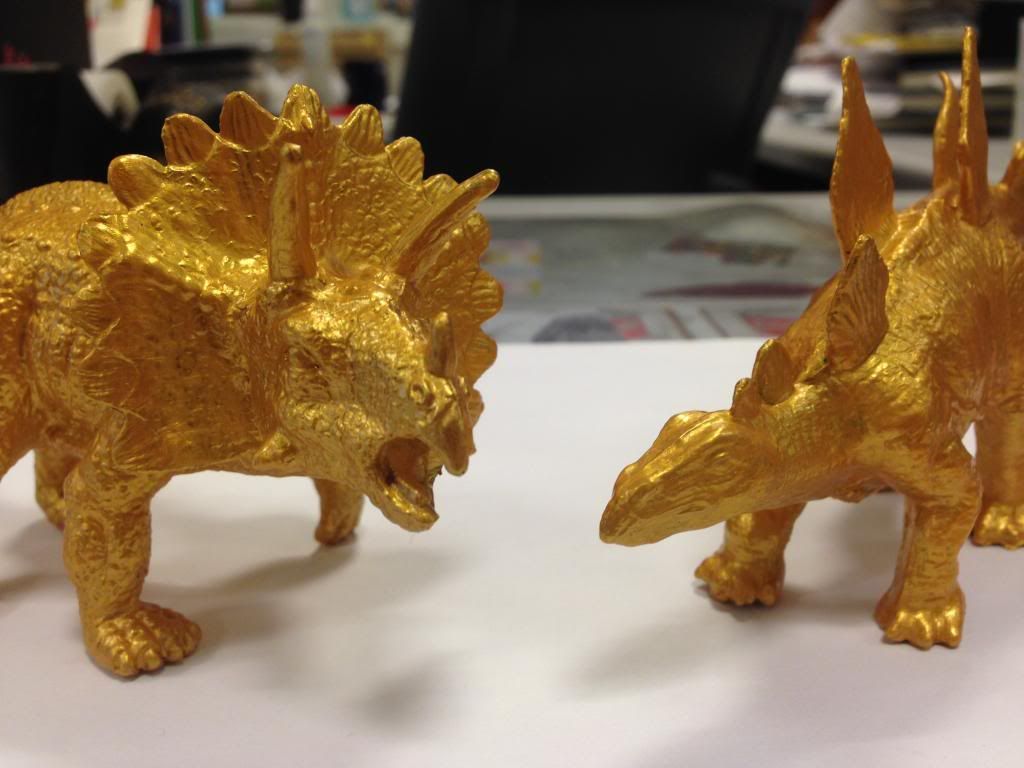
All Gold Everything...
As of late I've been really digging the whole painted toys thing that you see all over Pinterest. So I decided to get my craft on and paint some dollar store/thrifted plastic animal toys. Here are the results...

 As you can tell, I hand painted all of these. If you feel like messing around and making your own I'd totally recommend using spray paint because you have to put multiple coats on with the acrylic paint.
July 3, 2013
Craft Demo: Painted Flower Pot...
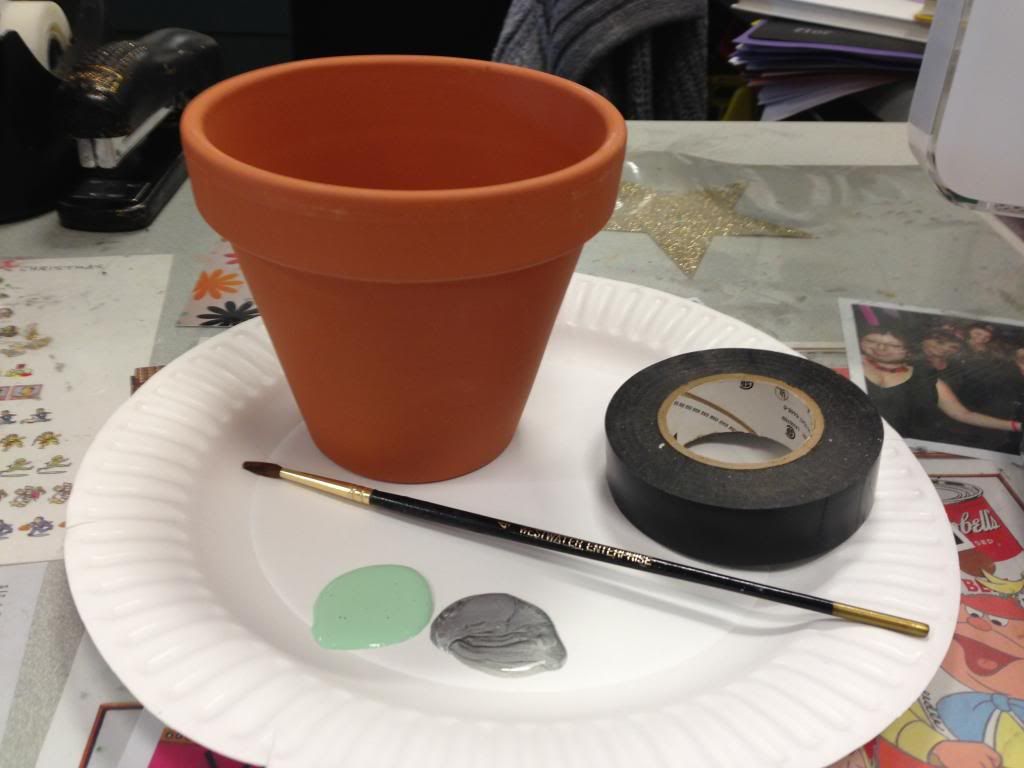
• Clay Pot • Tape • Paint Brush(es) •
• Acrylic Paint (Apple Barrel Colors - 20583 Victorian Green & Palmer Prism - 171503 Pure Silver) •
I've been seeing a lot of painted terracotta pots with portions of the pot exposed in my various reads recently and I really enjoy the look so I thought that I'd give it a try. And here is how it came out...
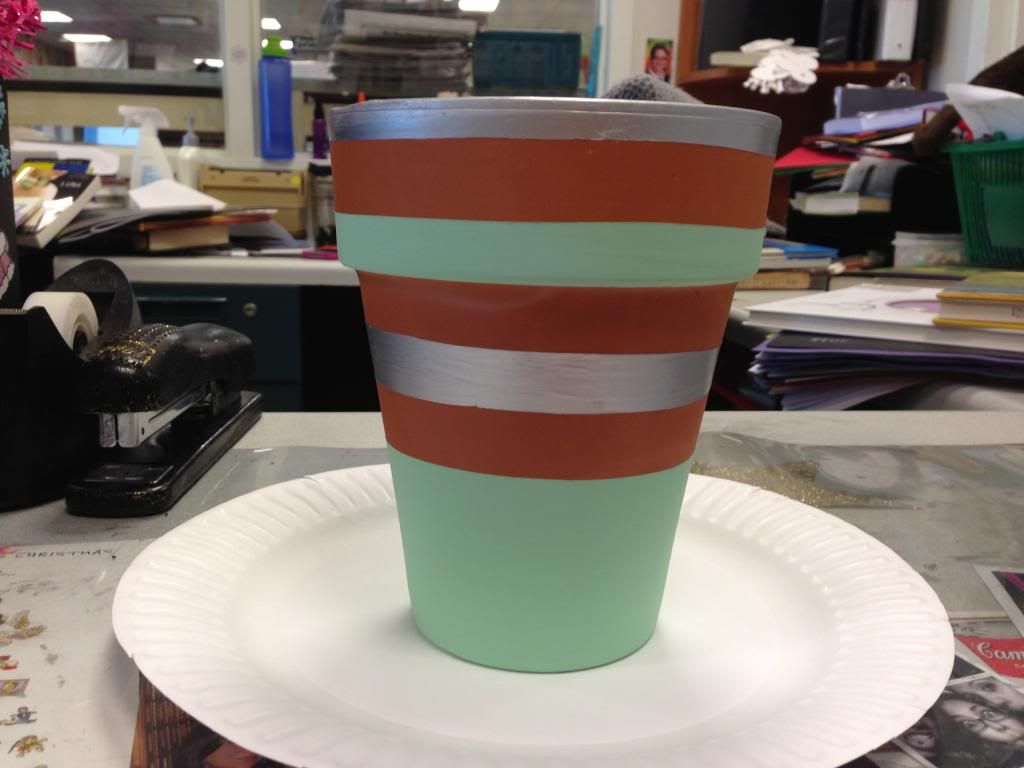
With my particular pot I used the tape (I couldn't find any masking tape, so I used what I had which was some electrical
tape) to create stripes in various sizes and painted around them with the minty green and silver alternating -- I am a big fan of that color combination.
I absolutely love the way it came out. I cannot wait to take this bad boy home and replant the basil that Phil gave me as a housewarming gift in it.
February 9, 2013
February 7, 2013
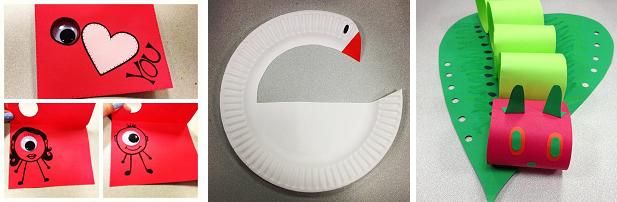
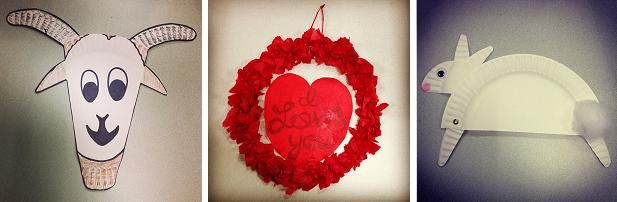
Getting My Craft On...
Since my library still isn't open to the public and I'm doing various odd tasks or whatever you'd like to call them, I decided yesterday that I was going to make a bunch of craft demos for story times I'd like to do when we are once again open for business or as an outreach type program. And since I think my crafts are pretty flipping cute I decided to share them all with you (Exciting, I know), so maybe you can get inspired to be a little crafty today.

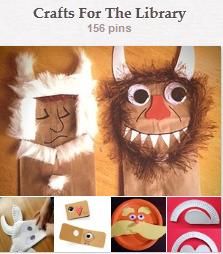
 I found some version of all of the crafts above on Pinterest, so if you're interested in instructions you can find them if you click on my "Crafts For The Library" board.
 On a side note, I know I haven't been the most exciting person as of late (I mean, aside from possibly breaking stuff and needing stitches) but I have a few interesting things coming up next week that I can't wait to share with all of you! I hope you're all out there doing wonderful things!
October 28, 2012
Becoming Mary Sanderson...
As I mentioned in my previous post my sister, Erin, a few of our friends and I went out to one of the local bars for a Halloween event they were having in all of our Sanderson sisters glory. And I figured since I did everything and Halloween hasn't actually passed that I'd put the following together in case anyone decides they'd like to be Mary Sanderson next year or even whip together something before Wednesday rolls around...


 I wasn't having any luck at the thrift store the first time around finding pieces to make my own costume so I hit up Amazon and bought a Tavern Wench costume by Disguise. Which I altered to make look more like Mary's outfit. I used some Sunshine Orange and Cherry Red Rit Dye to make the sleeves of the costume orange (They didn't come out the right shade because of the fabric but whatever, it's still orange). I attempted to make the vest/corset red using spray fabric paint (That was all I could find in Michael's) but it didn't work out so well so I left that sucker black. I attached a piece of a burgundy plaid sheet to the skirt portion to emulate what Mary had going on.
To top off the clothing portion I took a full length hooded red cape (Kinda like this one), dyed it with a mixture of Cherry Red and Black Rit Dye to make it a bit darker because it was too red and wore that with everything else.
PRODUCT LIST
 In order to get Mary's hair we looked at tons of pictures and I decided to search through YouTube to see if anyone had made video on how to get hair similar to hers. I happened to find the following video that FormidableArtistry had made...
After my sister and I watched the video we decided to play around and do a Mary hair trial. The first time we tried doing it we used a Solo Cup without anything stuffed inside of it and it didn't work out so well. So we threw that bad boy away and grabbed a styrofoam cup, stuffed it with a wash cloth and attached a piece of aluminum foil to it.
My sister sectioned my hair off, teased it and attached the front portion of my hair to the cup like FormidableArtistry did, but she didn't put my hair in a ponytail to attach the back. She just continued attaching the back portion the same way as she did the front because of the length of my hair, etc.
Once all of my actual hair was attached she took my clip-on hair extensions, flipped them upside down and started to attach them to my hair at the top of the cup. She used the clip-ons instead of a cut up portion of a wig like FormidableArtistry used and started wrapping them around the foil. The foil kept bending and pissing her off, so when we did my hair the day we were dressing up we used a piece of a wire coat hanger bent into an "S" shape instead. When she had everything pinned in place she took a long piece of yarn that I had braided, pinned it and wrapped it around my hair. When my hair looked right she sprayed all of the hair with washable black hair color and when that I was dry I combed in some purple hair mascara.
That's how I got my Mary hair!
PRODUCT LIST
 After hair comes make up...

 PRODUCT LIST
 To top off everything I made myself a vacuum cleaner out of some cardboard, white Duck Tape, a paper shopping bag and black spray paint. I honestly can't write out step by step instructions because I kinda just made it...

 * = These were a limited edition product. Also, unlike the normal collection of Impress nails these were much longer.
 I wasn't having any luck at the thrift store the first time around finding pieces to make my own costume so I hit up Amazon and bought a Tavern Wench costume by Disguise. Which I altered to make look more like Mary's outfit. I used some Sunshine Orange and Cherry Red Rit Dye to make the sleeves of the costume orange (They didn't come out the right shade because of the fabric but whatever, it's still orange). I attempted to make the vest/corset red using spray fabric paint (That was all I could find in Michael's) but it didn't work out so well so I left that sucker black. I attached a piece of a burgundy plaid sheet to the skirt portion to emulate what Mary had going on.
To top off the clothing portion I took a full length hooded red cape (Kinda like this one), dyed it with a mixture of Cherry Red and Black Rit Dye to make it a bit darker because it was too red and wore that with everything else.
PRODUCT LIST
- Tavern Wench Costume
- Hooded Full Length Cape
- Thrifted Plaid Sheet
- Leg Avenue Striped Knee Highs
- Black Ballet Flats
- Cherry Red Rit Dye
- Sunshine Orange Rit Dye
- Black Rit Dye
After my sister and I watched the video we decided to play around and do a Mary hair trial. The first time we tried doing it we used a Solo Cup without anything stuffed inside of it and it didn't work out so well. So we threw that bad boy away and grabbed a styrofoam cup, stuffed it with a wash cloth and attached a piece of aluminum foil to it.
My sister sectioned my hair off, teased it and attached the front portion of my hair to the cup like FormidableArtistry did, but she didn't put my hair in a ponytail to attach the back. She just continued attaching the back portion the same way as she did the front because of the length of my hair, etc.
Once all of my actual hair was attached she took my clip-on hair extensions, flipped them upside down and started to attach them to my hair at the top of the cup. She used the clip-ons instead of a cut up portion of a wig like FormidableArtistry used and started wrapping them around the foil. The foil kept bending and pissing her off, so when we did my hair the day we were dressing up we used a piece of a wire coat hanger bent into an "S" shape instead. When she had everything pinned in place she took a long piece of yarn that I had braided, pinned it and wrapped it around my hair. When my hair looked right she sprayed all of the hair with washable black hair color and when that I was dry I combed in some purple hair mascara.
That's how I got my Mary hair!
PRODUCT LIST
- Bobby Pins
- Hair Pins
- Teasing Comb
- Not Your Mother's 'Shes a Tease' Volumizing Hair Spray
- Clip-On Hair Extensions
- Styrofoam Cup
- Wash Cloth
- Wire Coat Hanger
- Yarn
- Scünci No Slip Head Wrap (Black)
- Fright Night Temporary Hair Color (Black Fog)
- Fantasy Makers Hair Mascara (Magic Mixture/Potion)

- NARS Pro-Prime Primer
- Garnier BB Cream (Light/Medium)
- BareMinerals Foundation
- Tarte Amazonian Clay Blush (Natural Beauty)
- Translucent Powder
- Orange Eye Shadow
- Black Eyeshadow
- Black Eyeliner
- NYX Soft Matte Lip Cream (Amsterdam)
- Impress Press-On Manicure (Total Witch)*


June 16, 2012
May 12, 2012
May 10, 2012
Much Needed Retail Therapy...
After having a slightly frustrating day because of the "Julia" crap earlier in the day, having to cover the Adult Reference Desk because they found the need to have a meeting on a day when my department was short staffed and dealing with the Mother's Day Craft (That was actually the least annoying part of my day), I decided that I needed to go shopping with my sister as soon as I was done for the day at work.
So, once 5:30pm rolled around I ran out and I picked my sister up as quickly as I could. We hit up a number of stores and I bought a bunch of various things (Clothing, makeup, a spiffy Lacoste beach towel, etc). It was what I needed after an annoying day (I love retail therapy), plus I needed new outfits for a number of upcoming outings/events I'm attending within the next few weeks.
Where are the pictures of all of these things you ask? I honestly don't feel like arranging everything I just got to take pictures, but I will tomorrow because I got some pretty cute stuff. Sorry for being lazy.
March 6, 2012
Craft Program Chaos...
Apparently I missed some chaos yesterday. "Amy" was in charge of a craft program/party that only eighteen individuals signed up for ahead of time (but there were enough crafts for twenty-four individuals) and when it was time for the program to start she had twenty-five children plus their parents trying to get into the program. Because she is a push over and believes in "good customer service" she through it best to let everyone in instead of turning the last family that walked into the door away. This apparently caused a bunch of problems. The mother of the last child to walk in got pissed at her that her child could not have a hat because they ran out. It apparently got so bad that the Director had to be call down to deal with what was going on.
Honestly this all could have been avoided if "Amy" would have just said no to the last family. We have limits on our programs based on the number of materials we have to do the program and for some reason she doesn't understand that. She believes that she was right and the mother was wrong, but in reality "Amy" was the root of the problem.
Some how we have to get it through "Amy's" thick skull that there is protocol and she has to stick to it. Whether it be the number of people allowed in a program or how to deal with individuals that do not know how to behave.
I honestly don't know how she got through her undergrad degree nonetheless her masters -- Actually I don't think her masters is worth the paper it is written on because she got it from some BS school online. She is a terrible librarian. Nice lady, but terrible librarian.
February 8, 2012
Valentines Day Craft...
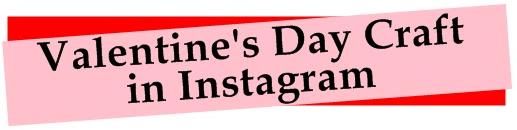


As our teen/tween Valentine's Day craft this year we decided that we were gonna make mini cupcakes and cakepops that they could decorate with frosting, sprinkles, sugar, marshmallows, various candies, etc.
Subscribe to:
Posts
(
Atom
)